GlusterFS dispersed volumes are like a combination between distribute and replicate. They offer you less storage than distribute, but with the same redundancy as replicate. The downsize is that you have to use six bricks and I am going to use three servers to make sure that my files will be available even if an entire server fails.
With a dispersed volume comprised of six bricks, you can lose any two bricks without losing any data, but it does require more storage space than distribute. For example, if you have 10TB of data, you will need at least 15TB of storage space to use disperse, because each file uses 150% of its size.
One more downside to using disperse is that if you want to increase your cluster size, you have to add another 6 bricks, so you will need an extra three servers. If you do that, the cluster will become distributed dispersed.
Now let’s get started. First you will have to install GlusterFS and then peer your servers. Click the previous links to learn how to do it.
After you’ve installed Gluster and peered your servers, we can setup the volume. I will create a 4+2 dispersed volume, just as I’ve explained above. If you want better redudancy, you can go for more. With 8+3, you need 11 bricks and you can lose up to 3 without losing data, and with 8+4 you need 12 bricks and you can lose up to four bricks.
In order to create the volume, we we will use following command, where g1, g2, and g3 are my servers, and /sda/brick, /sdb/brick are each server’s bricks.
gluster volume create gstorage disperse-data 4 redundancy 2 g1:/sda/brick g2:/sda/brick g3:/sda/brick g1:/sdb/brick g2:/sdb/brick g3:/sdb/brick
Note: If you choose to do a distributed dispersed volume, you have to be careful with the order of bricks. Don’t place more bricks from the same server next to each other, because you can lose your redundancy. In my example, I would continue with
g1:/sdc/brick g2:/sdc/brick g3:/sdc/brick g1:/sdd/brick g2:/sdd/brick g3:/sdd/brick.
Now you can start the volume
gluster volume start gstorage
And you can check if everything is looking ok
gluster volume status
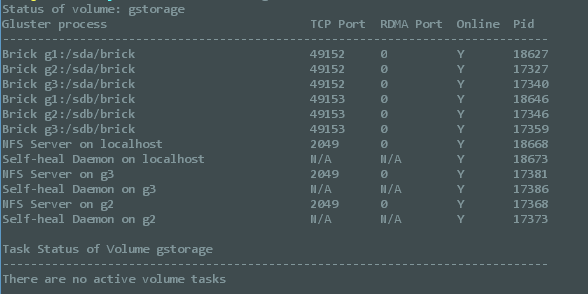
If everything is ok, it should look like this
The next step is to mount your volume. For my own use, I’m going to mount it on all three servers, but the process is very easy anyway.
mkdir /gluster
mount.glusterfs g1:/gstorage /gluster //where g1 is the current server and gstorage is the volume name
And you’re done. Now you can start adding files to /gluster and they will be split equally between your three servers.
If you want to make sure that your volume stays mounted after a reboot, you have to edit two files.
First, add this line to the end of /etc/fstab:
g1:/gstorage /storage glusterfs defaults,_netdev 0 0 //where g1 is the server name and gstorage the volume's name
Then you will have to edit /etc/rc.local and add this before exit:
mount /storage
Now you should be ready to go.